

Did you know that there are over 100 million Mac users today? Despite how popular Mac computers are, not everyone has an understanding of their basic features.
For example, many people who own a MacBook Pro or MacBook Air aren’t aware of common Mac shortcuts. One of the most useful is the shortcut to take a Mac screenshot. We’ve put together a brief guide to help simplify this process.
Let’s get started with what you need to know.
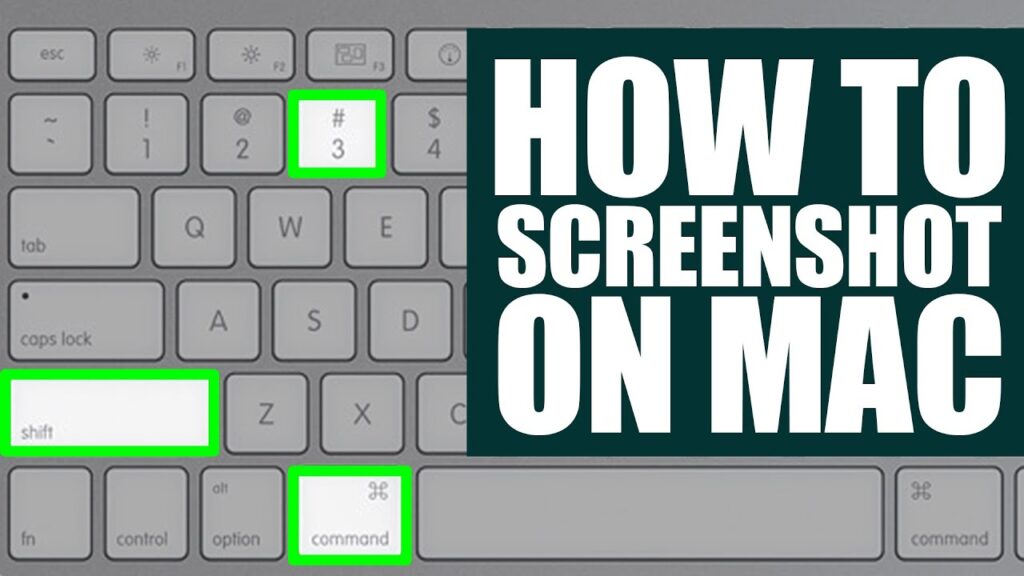
Using Command-Shift-3
To take a basic screenshot on your Mac, you’ll need to use the Command-Shift-3 shortcut.
This will take a picture of your entire screen and save it as a file on your desktop. This is useful if you want to capture everything that’s happening on your screen at a particular moment.
Using Shift-Command-4
If you only want to take a screenshot of a portion of your screen, you can use the Command-Shift-4 shortcut instead. This will bring up a crosshair cursor, which you can then click and drag to select the area you want to capture.
Once you’ve made your selection, release the mouse button or trackpad and the screenshot will be taken.
Using Shift-Command-5
If you’re running macOS Mojave or later, you can also take advantage of the new screenshot toolbar. To do this, simply use the Shift-Command-5 shortcut.
This will bring up the screenshot toolbar, which gives you a number of different options to choose from.
Using Touch Bar Screenshots
If you have a MacBook Pro with a Touch Bar, you can use this as an alternative to keyboard shortcuts. To take a screenshot, simply press the Control Strip icon and select “Take Screenshot.” You can then choose whether to take a screenshot of your entire screen or just a portion.
When Is Taking a Screenshot Useful?
There are a number of situations where taking a screenshot can be helpful. For example, if you’re working on a project and want to share your progress with someone, a screenshot can be a quick and easy way to do so.
Screenshots can also be useful for capturing error messages or other text that you may need to refer to later.
What Are Common Mistakes People Make When Taking Screenshots?
One of the most common mistakes people make when taking screenshots is failing to use the proper keyboard shortcut. As we mentioned, there are different shortcuts for taking screenshots of your entire screen or just a portion.
Be sure to use the correct shortcut for the type of screenshot you’re trying to take.
Remember, when you take a screenshot on your Mac, it’s automatically saved as a file on your desktop. If you don’t want to keep the screenshot, be sure to delete the file from your desktop.
How Can I Change the Default Location Where My Screenshots Are Saved?
If you want to change the default location where your screenshots are saved, you can do so by opening the “Screenshot” panel in System Preferences.
To access this panel, simply go to the Apple menu and select “System Preferences.” Then, click on “Extensions” and select the “Screenshot” extension.
From here, you should see an option to change the default save location. You can change this location to anywhere you like, but make sure it’s easily accessible!
Can I Use a Windows Keyboard to Take a Screenshot on a Mac?
Yes, you can use a Windows keyboard to take a screenshot on a Mac. More often than not, this involves using the Function keys (F1-F12).
For example, to take a screenshot of your entire screen, you would use the Function-Shift-F11 shortcut. To take a screenshot of just a portion of your screen, you would use the Function-Shift-Option-F11 shortcut.
Is It Possible to Record My Screen Activity?
Yes, there are a number of ways to record your screen activity on a Mac. If you just want to capture video footage, you can use the QuickTime Player application.
To do this, open QuickTime Player and select “New Screen Recording” from the File menu. For more advanced features, you can use a third-party screen recording application like Snagit or Camtasia. These applications offer a range of features, such as the ability to record audio, capture screenshots, and edit your recordings.
You can also use the native iMovie application to edit your recordings after you have saved them.
What Is “screenshot Shadow?”
If you take a screenshot on your Mac, you may notice that it includes a drop shadow. This is often referred to as “screenshot shadow” and can be disabled if you prefer. To do this, open the Terminal application and enter the following command:
defaults write com.apple.screencapture disable-shadow -bool true
Press Enter, then type the following command to restart the screenshot process:
killall SystemUIServer
Now when you take a screenshot, the drop shadow will no longer be included.
https://setapp.com/how-to/remove-mac-screenshot-shadow has more info on this process that you will find useful, so be sure to check it out.
Taking a Mac Screenshot Is Easier Than It Seems
The process for taking a Mac screenshot is relatively simple once you know the right shortcut.
Keep in mind that you can always edit your screenshots afterward using Preview or another image editing program. With a little practice, you’ll be able to take great screenshots at any moment.
Looking for other useful info that can help improve your use of technology? Be sure to check out the rest of our blog https://betechsoul.com for articles like this one.